|
The MASTER mode computer is connected directly to the CloudWatcher via the serial cable.
Configuring for MASTER Mode Operation
a. Run Setup.exe.
b. Create a directory in a local disk and make it shareable to other users in the local network.
c. Connect the CloudWatcher before starting the program.
d. Start program.
e. The program will prompt you:
|

|

|
Select Yes
|
|
Selects Master mode.
|
|
|

|
|

|
Cancel
|
|
Leave this dialogue box.
|
|
|

|
|
f. Select Yes for MASTER installation.
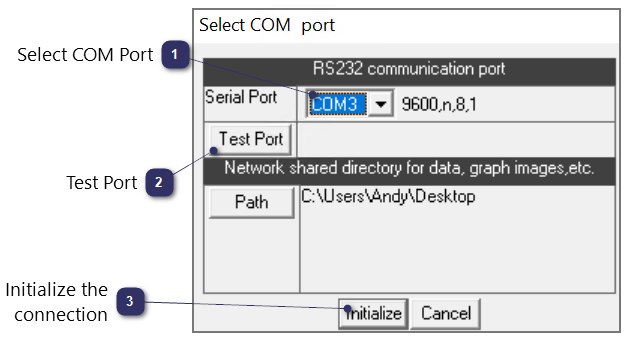
g. The program will display the following window:
|

|

|
Select COM Port
|
|
Select COM port that connects to the CloudWatcher.
|
|
|

|
|

|
Test Port
|
|
Test the serial connection.
|
|
|

|
|

|
Initialize the connection
|
|
Connects to the CloudWatcher
|
|
|

|
|
|
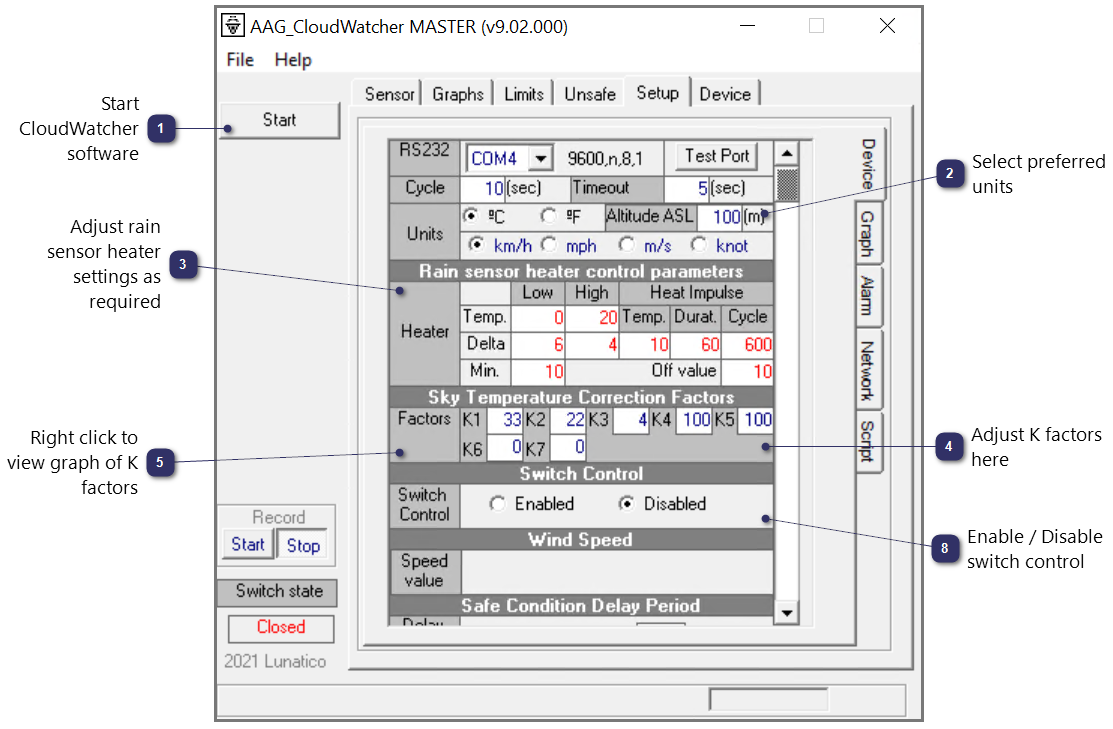
h. Check the Setup tab => Device section.
|

|

|
Start CloudWatcher software
|
|
Connects to the CloudWatcher and presents weather data. If correctly configured, writes the Parameters Transfer File. (See Remote Mode.)
|
|
|

|
|

|
Select preferred units
|
|
Select required combination of units. Altitude allows calculation of sea level pressure.
|
|
|

|
|

|
Adjust rain sensor heater settings as required
|
|
Items in red can be amended. You may wish to start with default values.
|
|
|

|
|

|
Adjust K factors here
|
|
The K factors can be to local conditions.
|
|
|

|
|

|
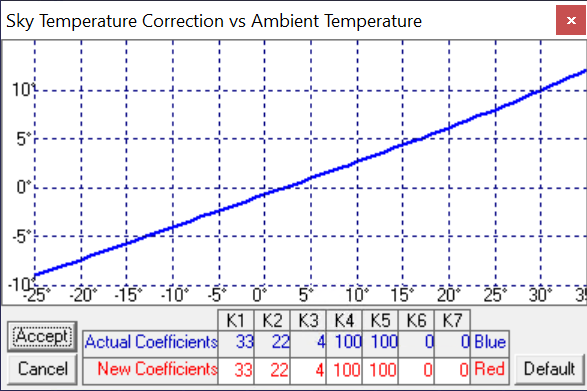
Right click to view graph of K factors
|
|
This can be helpful in visualising the effect of constants.
|
|
|

|
|

|
Enable / Disable switch control
|
|
If you intend to use the inbuilt switch, ensure it is enabled here.
|
|
|

|
|
|
.png)
|
-number-1.png)
|
Set safe condition delay
|
|
The CloudWatcher waits for this length of time after conditions become safe before reporting safe.
|
|
|
-control-1.png)
|
|
-number-2.png)
|
Set cloud alarm delay
|
|
The CloudWatcher waits for this length of time after detecting cloud before reporting unsafe.
|
|
|
-control-2.png)
|
|
-number-3.png)
|
Set temperature offsets
|
|
Allows tuning of temperature indictations.
|
|
|
-control-3.png)
|
|
-number-4.png)
|
Choose anemometer type
|
|
Older units have gray anemometers, more moder units are black.
|
|
|
-control-4.png)
|
|
|
|