

|
|
|
Now let’s see one by one the elements it is composed of:
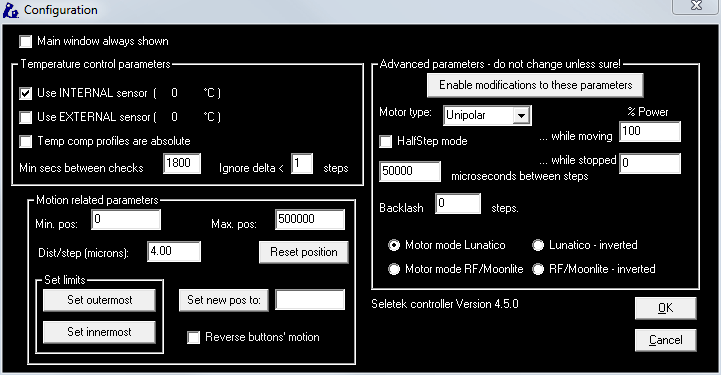
“Main window always shown”: activate it if you want to see the Seletek window constantly. It is very useful at the beginning or when troubleshooting focusing problems.
In the “Temperature control parameters” zone, we must select the temperature sensor we want to activate. The current temperature reading of any of the sensors is shown between brackets; when the external sensor is not connected, or if the temperature is extremely low, “N.A.” will appear.
More options:
Temperature compensation profiles are absolute: (relative if unchecked) – explained in the "Profiles" section.
Secs between corrections: time to be elapsed, after a correction, before a new check is made.
Ignore delta <: temperature differences implying a movement below that value (in steps) will be ignored by the tracking system.
In the “Motion related parameters” we define some physical data about the system:
Min position (0 in the example): the motor will move in a range from this number to the Max (this is, from 0 to 20000 in the example).
Max position (20000 in the example): the motor will move in a range from Min position to the number we indicate here (this is, from 0 to 50000 in the example). More about motion limits in short.
Dist/Step (microns): this piece of information is utilized by some automatic focus programs. Bearing the steps per turn of the motor in mind, and knowing or measuring how much the focus moves every turn, it is easy to calculate:
|
Micrometers by step = 1000* displacement per turn (in mm)/steps by turn. |
… as an example , for a focuser that moves 20mm by turn, and our standard 3600 steps/turn motor, the calculation will be: Micrometers by step= 1000* 20/3600= 5.55.
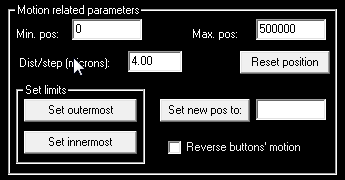
Let's wait a bit before going into the “Set limits” section.
Reset position: will set the current position as in the middle of the defined (Min..Max) range; so it will become 10000 in the example. No actual movement involved!
Reset Set new pos to : will set the current position to the value keyed at its right
Reverse button's motion : please use this to make your focuser move as advertised, that is, so that In, Cont-IN, … etc buttons will move the focuser in the appropriate way.
Let's go now to the “Set limits”:
There are two ways to limit the focus motion, always with the aim of avoiding damaging the focuser, motor etc.
The first
way: beginning from a position where we are near focus, give it a
motion range. We can manage this entering direct values in the “Max
pos” and “Min pos” fields just seen.
The procedure will be as follows:
To focus approximately (with any method)
Take down or memorize the current step number (let's say, 12345)
If you want the range to be +/- 500 steps, in the configuration window intro 12845 as Max pos and 11845 as Min Pos.
This is the simplest way of working, and it is perfectly convenient
for the majority of the cases.
Nevertheless, if:
The focus point is very close to one of the physical limits of the focuser
The telescope has the motor on permanently
Or we simply want additional security,
we can indicate the program where, exactly, are the focuser limits
Since v3.5 software and 2.2 firmware, even
physical limit switches can be used. Please pay a look at the last
section, Advanced
uses
.
This is
the second
way.
After quitting the configuration window, we must
move the motor (using the “OUT” or “Cont OUT” buttons already
explained) until the focuser is almost completely out of its trajectory; once
there, we go back to the configuration window and press the “Set
outermost” button.
We go back to the main window pressing “OK” and let’s move the focuser, always with the buttons (“IN” or “Cont IN”), until it is almost at the maximum limit inside its trajectory.
In both cases, and in order not to
the force the mechanism, a minimum safety margin, such as ½ millimeter will be
enough.
Again to the configuration window and now we press “Set innermost” button.
And so it is. The system now knows the motion limits and will never get out of them. It is a simple process but, since the motor is rather slow, it can be boring to implement. By the way, the motion limits will not be enforced until both have been defined; once done, the “Max pos” and “Min pos” fields will be updated with the new values, and of course can be changed at anytime.
Back to our review by the configuration window, there are a few buttons left to describe:
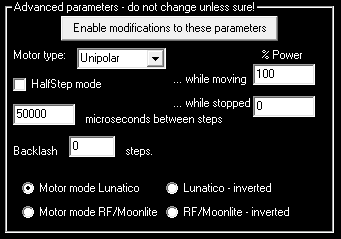
The “Advanced parameters...” area, as
it full name says, while powerful is also potentially dangerous. If you are sure
you want to modify those, you'll have to press the “Enable modifications to
these parameters”, then agree to a popup window, and you'll
have full freedom.
All the modifiable fields have a “tooltip” (a short help message that will display as you pass your mouse pointer over it) that will help you find correct values, but let us insist again: do not change them unless you know for sure you must do it.
The most dangerous things you can do:
Selecting a wrong motor type! (Lunatico, as of today, only supplies unipolar motors) : the motor may heat and permanent damage can occur, including risk of fire.
Increasing the % Power while stopped: the motor will be energized while stopped, again will overheat and can result in permanent damage and even fire.
Basically, the type of motors:
Unipolar: a standard stepper motor; Lunatico supplies unipolar motors, and Moonlite and Robofocus motors are also unipolar ones.
Bipolar: a different type of stepper motors.
DC: inexpensive motors, usually found on cheap focusers. No step position control. However, the Seletek will operate them simulating steps, obtaining very good results.
Step & Dir: the controller will output these signals to an external motor driver. With this option we've opened the door to controlling any possible motor.
|
Important: any motor you plug to the controller should not take more than 1A current. If you are changing motors, either you know what you're doing or please do ask us before damaging the controller. |
Regarding the motor mode, this is really simple: before firmware 1.5 (quite long ago), the Seletek controller drived motors in a fixed way; for Robofocus(tm) or Moonlite(tm) motors, a specially wired cable was needed.
Now we
have improved the firmware and software so no special cable is needed. The
configuration goes like this:
|
Motor connected |
Cable |
Select Mode |
Notes |
|
Lunatico |
Straigh |
Lunatico |
Default mode |
|
Robofocus(tm) or Moonlite(tm) or compatible |
Straigh |
RF/Moonlite |
Will not work with the hand
pad if no PC is attached - configuration is saved at the
PC! |
|
Robofocus(tm) or Moonlite(tm) or compatible |
Specially wired |
Lunatico |
Suitable for people updating from previous versions |
|
Lunatico |
Specially wired |
RF/Moonlite |
Odd combination |
The “inverted” modes just step in the opposite direction – select inverted if your automated software is confused about what's IN and OUT.
For any other case please select the default “Lunatico” mode.